Creating a Fake Refraction, Bubble Shader for your 2D Godot Game!

Video Version
Asset Creation: https://www.youtube.com/watch?v=udbPym1JjkY&t=192s
Shaders: https://www.youtube.com/watch?v=-W_2OzjnUl4
OK so you have that cool 2D Bubble Bobble inspired game but you want to add some modern flare? Or maybe you just got some random pixel assets you'd like to experiment with adding fake "refraction" too? I've got you covered!
Cheaters that don't want to read?
 |
| You when you don't read this tutorial |
For cheaters, here's the code, right away, to play with :
Refrac-What?
So what is refraction? In simple terms light bends and changes direction as it goes from one medium to another. For example when it passes through water in a glass, it slows down and changes direction causing a distorted appearance to anyone looking through the glass. Different materials have different refraction amount, and the angle and effect is more pronounced.
 |
| Showing Refraction through a Prism |
The amount of this angle distortion is described in Snells law as the Index Of Refraction.
The vacuum of space has an index of refraction of 1.0, so basically no material distortion at all. In those cases you'd see no vector angle between incident (left hand side) and refractive (middle), or leaving the rectangular solid Prism.
If we were to model this with
- Normal vector (shown as doted line)
- Incident vector P
- Refraction vector Q
- Bubble surface (interface, horizontal line)
With a greater than 1.0 index of refraction it would look something like this (below)
 |
Snell's Law (showing refraction) |
So the Blue area represents the Bubble shell. Technically, in the real world there's another refraction happening as Q exits the bubble region (blue), but... this is a 2D game! :) Let's just make it look good enough to be believable.
Goal
Our goal is to simulate 3D refraction using a normal map and some basic screen color lookups.
For simplicity we'll assume that there is nearly no index of refraction here. We can tweak later for any desired affects.
Remember we are making a game. We'll just go for "Good enough to be Fun"! We aren't going for a perfect physics simulation here.
Basic Setup
2) I'll assume you already have prototype game you'd like to include this effect in. For your convenience I'll include a GitHub link with a working basic prototype for you to play with.
3) Download the latest Gimp
https://www.gimp.org/downloads/
3.a) Download latest Gimp Normal Map Plugin
https://code.google.com/archive/p/gimp-normalmap/downloads
3.a) Download latest Gimp Normal Map Plugin
https://code.google.com/archive/p/gimp-normalmap/downloads
4) Download the latest InkScape
Create Graphics

Ok with all that out of the way, let's start creating the effect! :)
For this you can create whatever bubble graphics you'd like.
1) If HD Style, I recommend just using InkScape

- Select the circle tool
- Hold SHIFT + CTRL while resizing
- Create an inner circle with circular gradient
- Create a fake shine (small circle in pure white. I put in upper left)
Note: I have red background just so I can see what I'm doing (white and all). When exporting just pick "export only selected" and make sure everything you'd like to export is selected (grouping helps with this).
2) If using Pixel Style, I recommend creating in InkScape (as in step 1) and just down scaling then cleaning up in Gimp

Create a Height Map for the Bubble
What's a "Height Map" you say? It's basically just represents the 3D height out of the screen (white) and into the screen (black). At screen level would be basically grey (half between black and white).
So TLDR,
- White is the highest level out of screen (pointing towards your face :) )
- Black is the lowest level deep into the screen (away from your face).
This data can help us construct how the object should do fake refraction, as we will use this "Height Map" to generate a normal map. Both are data structures that describe the surface of an object, to fake 3D.
1) Create a Black Square
- Select Square tool with Black fill
- Hold Shift + CTRL to keep as a perfect square
- Drag to a reasonable size

2) Create a circle, using Circle tool

with a "Circular Gradient"

3) Center the circle in the black background square using Vertical and Horizontal align Or just by hand (grid is handy here).
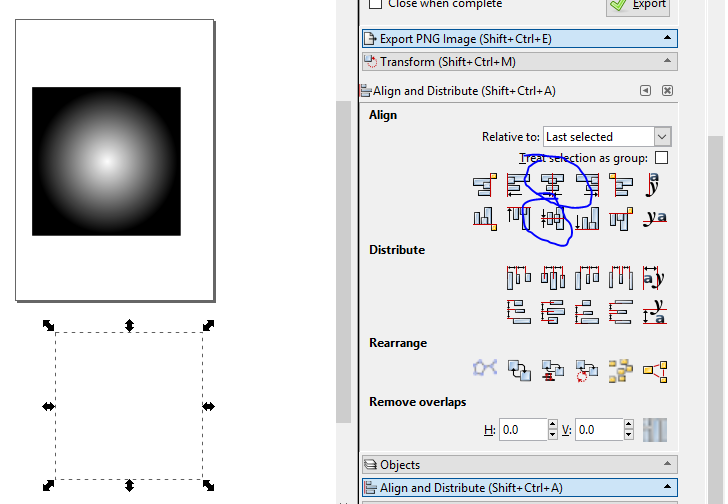
3) Group back Square and circle by selecting both and selecting Object -> Group
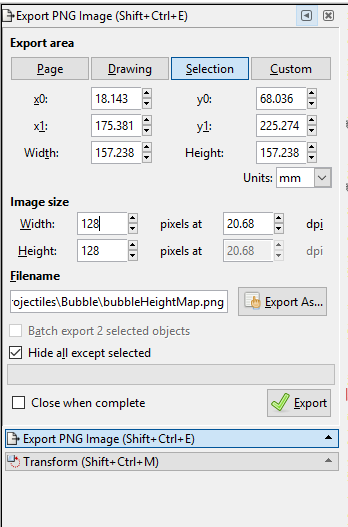
4) Export the circular Gradient
- Select just the Group you've created
- Be sure to select "Hide all except selected"
- Select "Image size" as a power of 2
- I chose 128 X 128 pixels
- Call it "bubbleHeightMap.png"
- Click "Export" and make sure you export it to some place sane in your project
- I prefer keeping raw assets like this that aren't used in game, outside of the Godot project
- So maybe CoolGame/RawGraphics/Projectiles/Bubble/bubbleHeightMap.png
- While your Godot project is in: CoolGame/Godot/
- See my example project for more details
Create a Normal Map from the Bubble Height Map
1) Open Gimp and open the "bubbleHeightMap.png" you've just created:

2) Select Filters-, - Map - Normalmap

3) Try these normal map settings
- Filter 9x9
- Seems to add a nice gradual map
- Scale 10
- Makes the effect more noticeable

4) Pick File , then Export As
- Choose path in Godot Project For example
- Project/Godot/RawTextures/Projectile/bubbleNormalMap.png
Create Initial Bubble Graphic Scene
1) Open Current Godot (You can use my template or your current game etc) :)
2) Create a new Scene
3) Add a Node2D (name it "BubbleGraphics")
4) Add your sprite for bubble Graphics (created earlier in Inkscape and Gimp)
5) Add a Node2D sub (node to BubbleGraphics) (Call it "BubbleShaderSprite")
6) Add Bubble texture to BubbleGraphics (white texture)
7) Add Bubble Normal map to BubbleGraphics
Your scene should look like this now :)

8) Add White bubble texture to "bubbleShaderSprite"
Your scene should look like this:
Add Float effect to bubbleShaderSprite
1) Click "Material" panel drop down on right
2) Select "New Shader Material"

Lets dissect what we are doing here.
- shader_type canvas_item;
- Just tells us this is a Canvas type 2D godot shader
- timeScale
- just tells us how much TIME will affect the wave functions we've created
- amplitude
- is the wave amplitude (how far up and down the bubble will float :))
- void vertex()
- Says this script only affects where vertices are draw on the screen
- VERTEX.y += sin(TIME * timeScale + VERTEX.y + VERTEX.x) * amplitude;
- Affects the height of the bubble... you know Floating and all :)
TLDR it floats sightly up and down for a idle animation

Create Refraction Shader
This is what creates the cool distortion effect for things "behind" and around the bubble.
1) Click "bubbleGraphics"
2) Click Material -> "New Shader Material"
3) Enter the following script:
Script Explained
- This is a fragment shader which means it decides how to color every pixel on the screen.
- This script can pragmatically alter those colors later in the pipeline.
- This allows us to do cool things like sample the screen colors around the bubble and use that pixel as a kind of bubble distortion.
vec3 refraction = - texture(NORMAL_TEXTURE, UV).rgb * vec3(1.0,-1.0,1.0);
- refraction is just the reverse of our normal vector (why there's a leading minus sign)
- We are multiplying by vec3(1.0, -1.0, 1.0) which inverts the y axis.
- Our normal map has y axis going up, but Godot 2D engine has Y axis going down, so we use this to reverse it
- texture(NORMAL_TEXTURE, UV) is just the normal map texture lookup for this fragment
vec4 textureRead = texture(TEXTURE, UV);
- This just reads the "White" bubble pixel texture

vec4 offsetScreenRead = textureLod(SCREEN_TEXTURE, SCREEN_UV + refraction.rg/30.0, 0.0);
- This is our screen read around and behind the bubble to create our magnified bubble distortion effect.
- It uses the previously computed refraction vector to decide what pixels to grab from the screen
- refractionMagnitude is just a scaling effect for how dramatic the effect is.
- If large it will capture more of the screen and tend to look unreal but cool for some different effects (warp ? :) )
- Keep in mind, you don't need to use "textureLod", you can use "texture(".
- textureLod allows you to set the last parameter to blur the results, if you'd like
Results :)


Please let me know any improvements or questions you may have!
Did this help you? Did you get stuck? Need clarification? Let me know by commenting below.
Here's the code for you to play around with:
- https://en.wikipedia.org/wiki/Refraction
- Cristan at English Wikipedia, Sawims at Dutch Wikipedia - This file was derived from: Wet van snellius.svg
- GDQuest - https://www.youtube.com/watch?v=xoyk_A0RSpI
- - Inpsiration for the bubble wave vertex shader

Comments
Post a Comment